
I still remember the evening I opened the cabinet under the sink and found that familiar damp smell waiting there. A tiny drip caught the light from the window, almost like a faint star flickering in the dark corner of the cabinet.
At that moment, I knew you didn’t need plumbing theory, you needed a fast, reliable fix. I wrote this how-to-replace-a-drain-trap guide so you can stop leaks, remove odors, and restore smooth drainage without calling a professional.
Understanding Drain Trap Replacement Basics
- Shut off nearby water use first
- Place a bucket under the trap
- Loosen slip nuts carefully
- Remove the old trap section
- Install the new trap with washers
- Test for leaks before closing cabinet
When I explain how-to-replace-a-drain-trap, I focus on keeping the process simple, clean, and affordable. I want you to stop odors, prevent cabinet water damage, and restore proper drainage quickly.
We begin with safe removal, continue with correct washer placement, and finish with leak testing. This method keeps the repair easy for you and avoids unnecessary plumbing frustration.
Signs Your Drain Trap Needs Replacement
- Water dripping under the sink
- Persistent sewer-like odor
- Visible cracks in the trap
- Rust or corrosion on metal parts
- Loose slip nuts
- Water stains inside cabinet
- Slow drainage with smell
- Repeated leaks after tightening
- Trap section looks warped
Why Drain Traps Fail or Leak
I usually find that most trap problems come from worn washers, cracked plastic, or loose slip nuts. I also see old metal traps corrode over time, especially when moisture sits in the cabinet for long periods.
Sometimes I notice the trap was installed at the wrong angle, which creates poor sealing and recurring drips. In how-to-replace-a-drain-trap, I always remind you that bad alignment often causes leaks even with a brand-new part.
If you replace the trap but ignore damaged washers or uneven connections, the smell and dripping often return. The right fit matters more than force.
Tools and Materials for Replacing a Drain Trap
I like starting with a simple setup that keeps the replacement quick. I recommend a new P-trap kit, slip-joint pliers, a small bucket, towels, rubber gloves, and replacement washers. If the old trap is stuck, I use adjustable pliers with gentle pressure to avoid cracking nearby pipes.
I also keep plumber’s tape nearby, though most modern slip-joint traps seal with washers alone. A flashlight helps me inspect the sink tailpiece and wall pipe alignment before installation.
Having the right materials ready makes the job faster, cleaner, and easier for you. When I prepare everything first, I avoid repeated trips back under the sink and reduce the chance of installation mistakes.
Essential Items Required Before You Start
I always begin with a bucket, towels, pliers, and the new trap kit. I find these handle nearly every basic replacement. If you place the bucket directly below the bend, you catch standing water and avoid cabinet mess. Simple preparation makes the entire repair smoother and faster for you.
Optional Supplies for Easier Installation
For easier fitting, I sometimes use a flashlight, extra washers, plumber’s tape, and a small brush for cleaning old residue. I use these when fittings are misaligned or dirty. These extras help you create a cleaner seal and reduce future leaks.
Step-by-Step Drain Trap Replacement Process
- Place bucket below trap
- Loosen both slip nuts
- Remove old curved trap
- Empty trapped water safely
- Clean tailpiece and wall pipe
- Fit new washers correctly
- Tighten nuts by hand, then lightly with pliers
- Run water and check leaks
I designed this section of how-to-replace-a-drain-trap so you can follow the process in order and avoid sealing mistakes.
Replacing a Drain Trap Without Professional Help
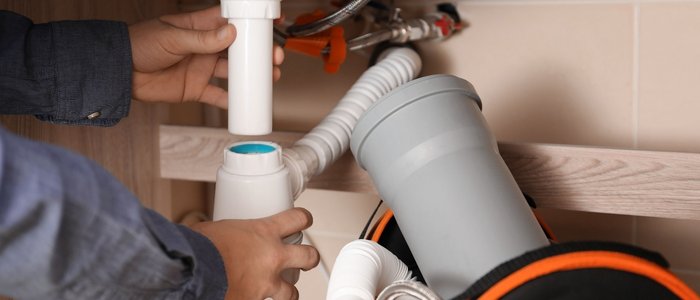
I first place a bucket underneath and loosen the slip nuts slowly. Once I remove the old trap, I clean both connection points before fitting the new one. Then I align the washers, tighten carefully, and run water to test. This simple process usually solves both leaks and odors fast.
- Use bucket
- Remove old trap
- Clean fittings
- Insert washers
- Align new bend
- Tighten evenly
- Test water flow
- Recheck for drips
Simple DIY Methods to Install a New Drain Trap
- Bucket
- Pliers
- Remove trap
- Clean pipe
- Add washers
- Align bend
- Tighten nuts
- Run water
- Check leaks
- Dry cabinet
I prefer this method because it keeps the repair straightforward and reduces mistakes. I always tighten just enough for a seal because overtightening often cracks plastic fittings. A careful fit gives you a longer-lasting, leak-free result.
Drain Trap Types and When to Use Them
| Trap Type | Best Use | Result |
| PVC P-trap | Most bathroom and kitchen sinks | Affordable, easy DIY install |
| Chrome trap | Visible decorative bathroom sinks | Cleaner appearance, durable |
| Flexible trap | Tight spaces or temporary fixes | Easy fit, less ideal long term |
I compare trap types this way so you can match the replacement to your sink setup instead of guessing. I trust PVC for most home repairs because it seals easily.
I use chrome when the pipe remains visible. For awkward cabinet spaces, I may use flexible traps temporarily. Choosing the correct trap prevents repeated leaks and bad odors.
Mistakes to Avoid When Replacing a Drain Trap
I always avoid overtightening because it cracks plastic and distorts washers. I also never reuse old washers, since they often cause repeat leaks. If you install the trap at the wrong angle, I find the water seal may fail and sewer odors return.
In how-to-replace-a-drain-trap, I also warn against leaving old debris on the pipe ends because buildup prevents tight sealing. I never skip leak testing after installation. A two-minute water test saves you from hidden cabinet damage later.
Tips to Prevent Future Drain Trap Leaks
- Check slip nuts monthly
- Replace worn washers early
- Avoid harsh chemical cleaners
- Keep cabinet dry
- Don’t overtighten fittings
- Clean buildup regularly
- Inspect after heavy sink use
- Watch for odor changes
FAQ
How to remove a stuck p-trap?
First, turn off the water and place a bucket underneath. Apply penetrating oil to the slip nuts and let it sit for a few minutes. Use an adjustable wrench or channel-lock pliers to gently loosen the nuts. If it’s still stuck, try tapping lightly with a rubber mallet or carefully twisting back and forth until it moves. Avoid forcing it to prevent cracking the pipes.
What tool to use to remove P-trap?
Typically, you can remove a P-trap using an adjustable wrench or channel-lock pliers. For plastic traps, hand-tightening is often enough no tools required. Always place a bucket underneath to catch water.
How to remove a kitchen sink drain trap?
Place a bucket under the trap to catch water. Loosen the slip nuts connecting the trap to the sink drain and wall pipe by hand or with pliers. Carefully remove the trap, then clean or replace it as needed. Reassemble by tightening the slip nuts securely.
What is the difference between a drain and a trap?
A drain is a pipe that carries wastewater away from sinks, tubs, or appliances. A trap is a curved section of that pipe designed to hold water, creating a seal that prevents sewer gases from entering your home.
Conclusion
I wrote this guide so you can handle a leaking or smelly drain trap with confidence the moment it happens. I know the smell under the sink and the sight of water in the cabinet can feel frustrating, but I also know this is one of the easiest plumbing fixes you can do yourself.
Start with safe removal, clean the fittings, install fresh washers, and tighten the new trap carefully. I built this how-to-replace-a-drain-trap article around real homeowner situations because I want you to solve the issue quickly without guesswork.
We focus on simple steps that stop leaks, restore the water seal, and eliminate odors without unnecessary complexity. The real value is giving you a reliable DIY fix that protects your cabinet, keeps your sink fresh, and saves you time the next time the trap fails. Now that you know the full process, are you ready to replace your drain trap today?